Hotspots on Solar Panels: How to Detect, Diagnose and Fix Them
What causes hotspots in solar modules, how to find them with thermal imaging, how to judge severity by temperature difference, and when cleaning, shade removal or module replacement is the right fix.
A hotspot is a small area of a solar module that runs much hotter than the rest of the panel. You usually can't see it with the naked eye, but a thermal camera shows it clearly as a bright patch on an otherwise uniform module. Hotspots matter for two reasons: they reduce power output, and sustained high temperatures can damage the module's encapsulant and backsheet, creating a fire risk in the worst cases.
This guide explains why hotspots form, how to find and classify them, and what can — and can't — be repaired.
Quick answer
Hotspots form when a cell or group of cells produces less current than the rest of the module and starts to dissipate power as heat instead of producing it. The most common causes are localised shading or soiling (bird droppings, leaves, dust edges), cracked cells, faulty solder connections and failed bypass diodes. Detect them with a thermal camera at irradiance above 600 W/m². Remove the shading or soiling first; if a hotspot persists and is severe, the module usually needs replacement under warranty.
How hotspots form
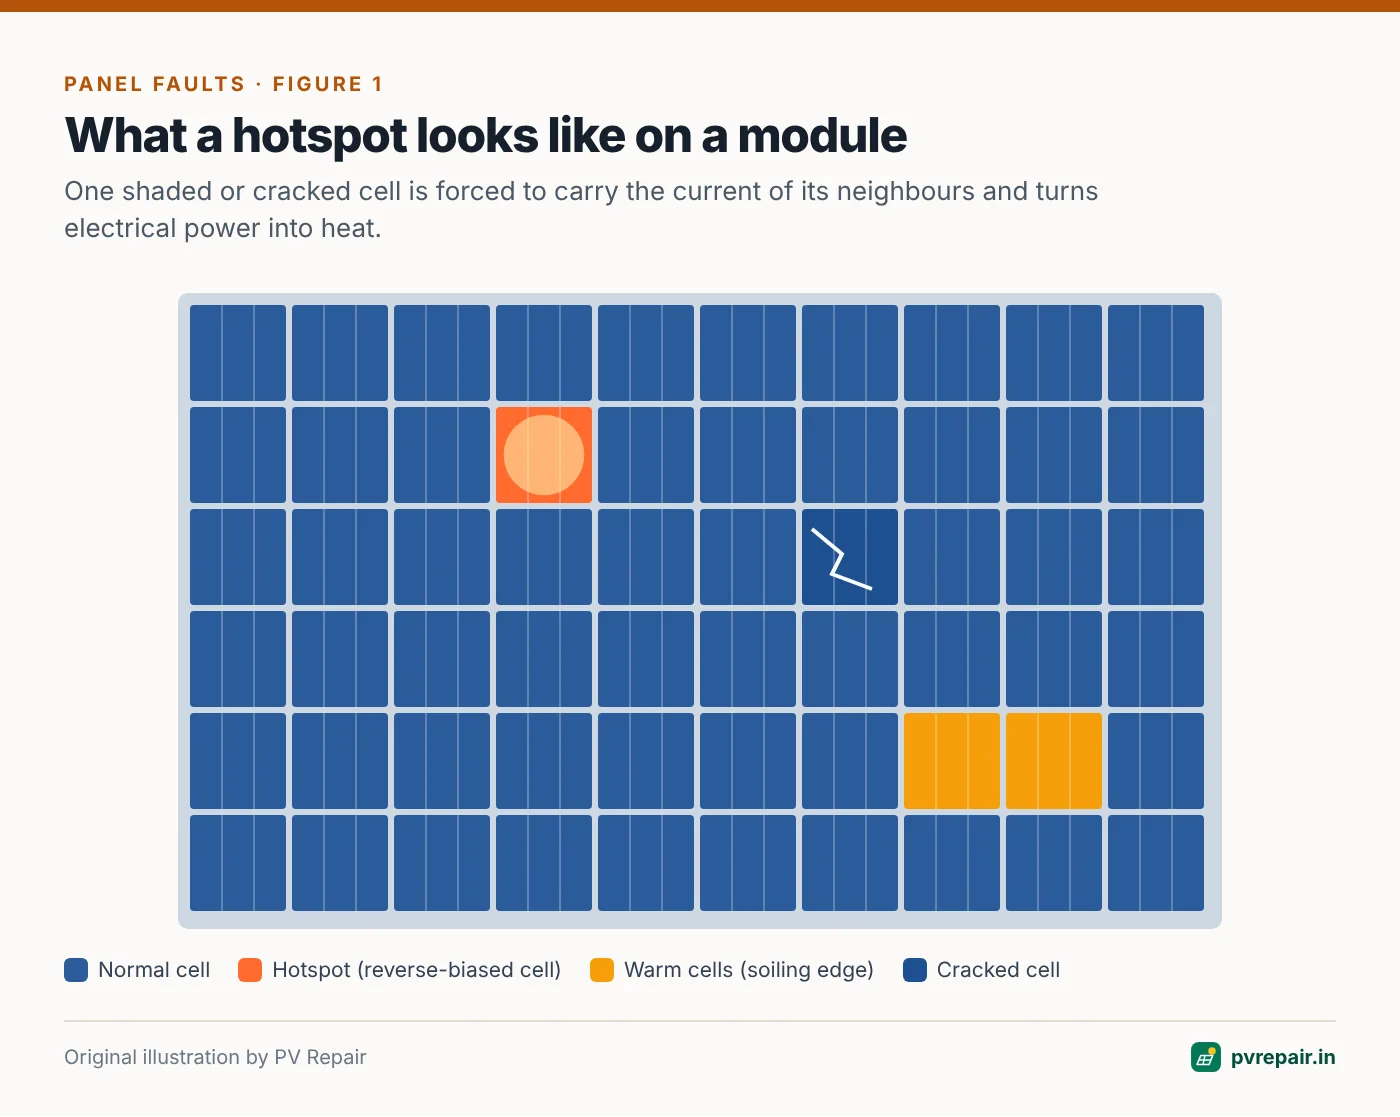
In a module, cells are connected in series. The current through every cell in a series chain must be the same. If one cell can't produce as much current as the others — because it's shaded, cracked or degraded — the other cells push current through it. The weak cell becomes reverse-biased and starts consuming power instead of generating it. That power turns into heat concentrated in a small area.
Bypass diodes limit the damage by routing current around a group of cells (typically a third of the module) when that group is underperforming. But they only activate once the reverse voltage across the group reaches a certain level, so a single partially shaded cell can still heat up significantly before the diode conducts. If a bypass diode has failed, the heating can be more severe.
Common causes
Localised shading and soiling
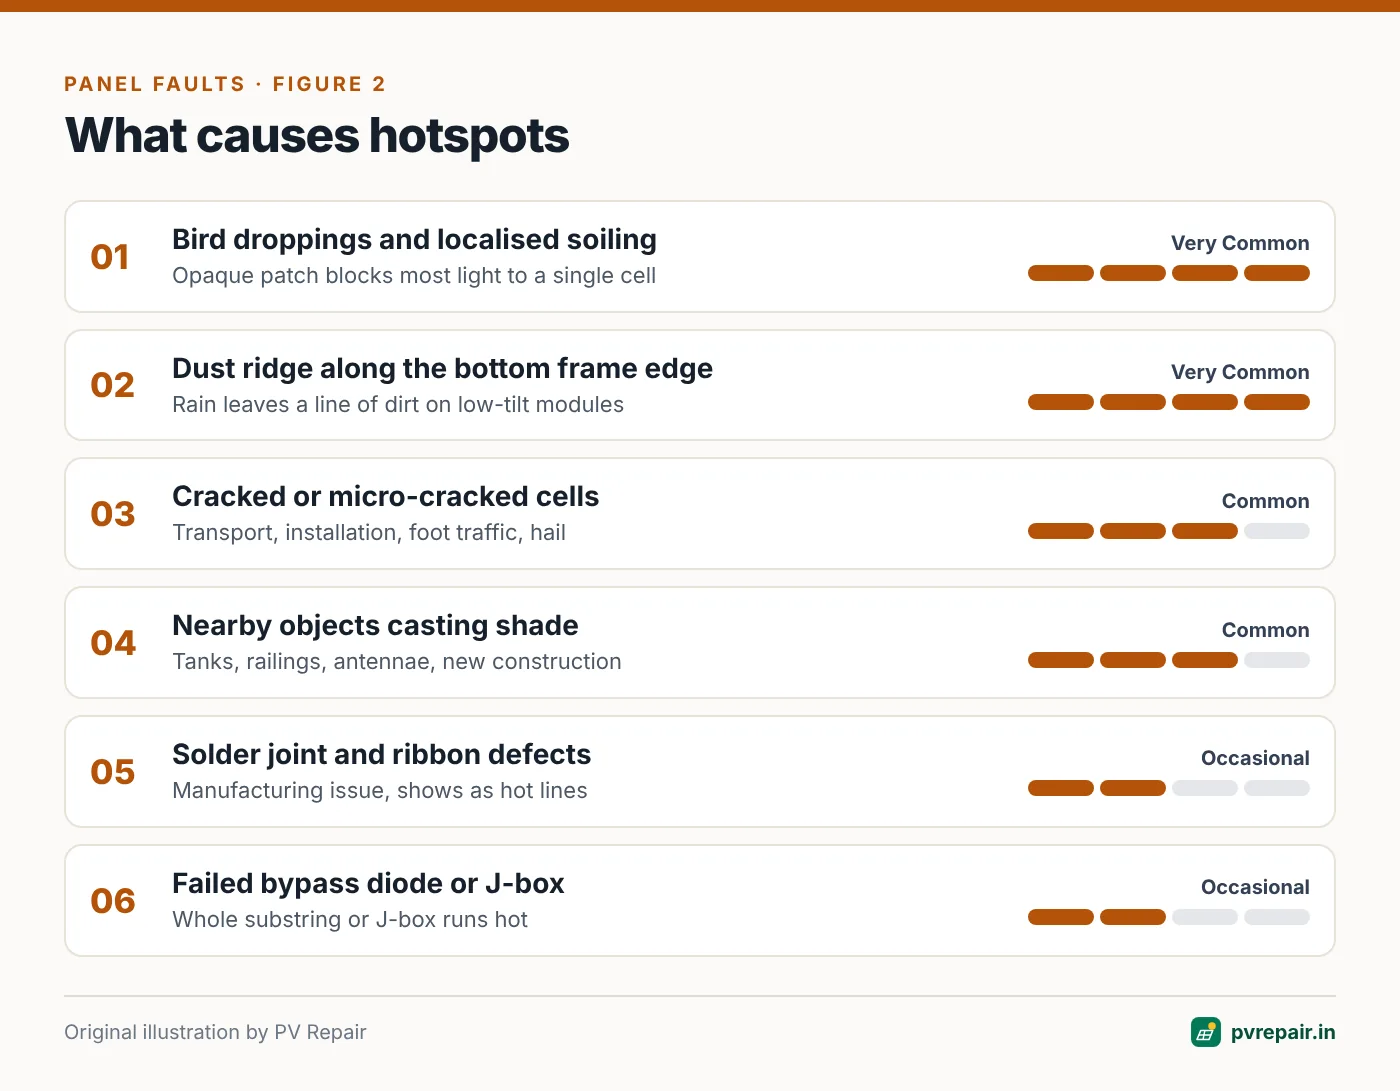
Bird droppings are the classic example — a small, opaque patch that blocks most light to one cell. Leaves, dust ridges along the bottom edge of the frame (where rainwater leaves a line of dirt), nearby antennae, pipes, railings and new construction can all create localised shading. In India, dust accumulation along the lower edge of low-tilt modules during the dry season is a very common contributor.
Cell cracks and microcracks
Cracks — from transport, installation, foot traffic or hail — isolate parts of a cell, reducing its current. The affected cell runs hot. See microcracks and snail trails.
Poor solder joints and ribbon defects
Manufacturing defects in cell interconnections increase resistance. Under load, these points heat up. They often show as hot lines or spots along busbars or ribbons rather than whole cells.
Bypass diode and junction box faults
A shorted diode removes a third of the module from production; an open diode leaves the substring unprotected. Junction boxes with poor connections can themselves be hotspots. See bypass diode failure and burnt junction boxes.
Potential-induced degradation and mismatch
PID and cell-level degradation can cause groups of cells to underperform, appearing as warmer cells in a pattern across modules. See PID.
Detecting hotspots with thermal imaging
A thermal (infrared) camera is the main tool. For meaningful results:
- Irradiance must be high and stable. International guidance for PV thermography (IEC TS 62446-3) calls for at least 600 W/m² in the plane of the array. Clear skies around midday are ideal.
- The system must be operating — connected and producing power, not open-circuit. Under open-circuit conditions, current doesn't flow and many defects won't show.
- Angle matters. View the module front at an angle of roughly 60–90° to the glass to avoid reflections of the sun or sky. Glass is reflective in infrared, so watch for false hotspots caused by reflections of nearby hot objects.
- Use a consistent temperature scale across images so you can compare modules.
- Drones are now widely used on larger rooftops and ground-mount plants to scan arrays quickly with radiometric cameras.
When you find a suspicious area, look at the module from a different angle. A real hotspot stays in the same place on the module; a reflection moves.
Judging severity
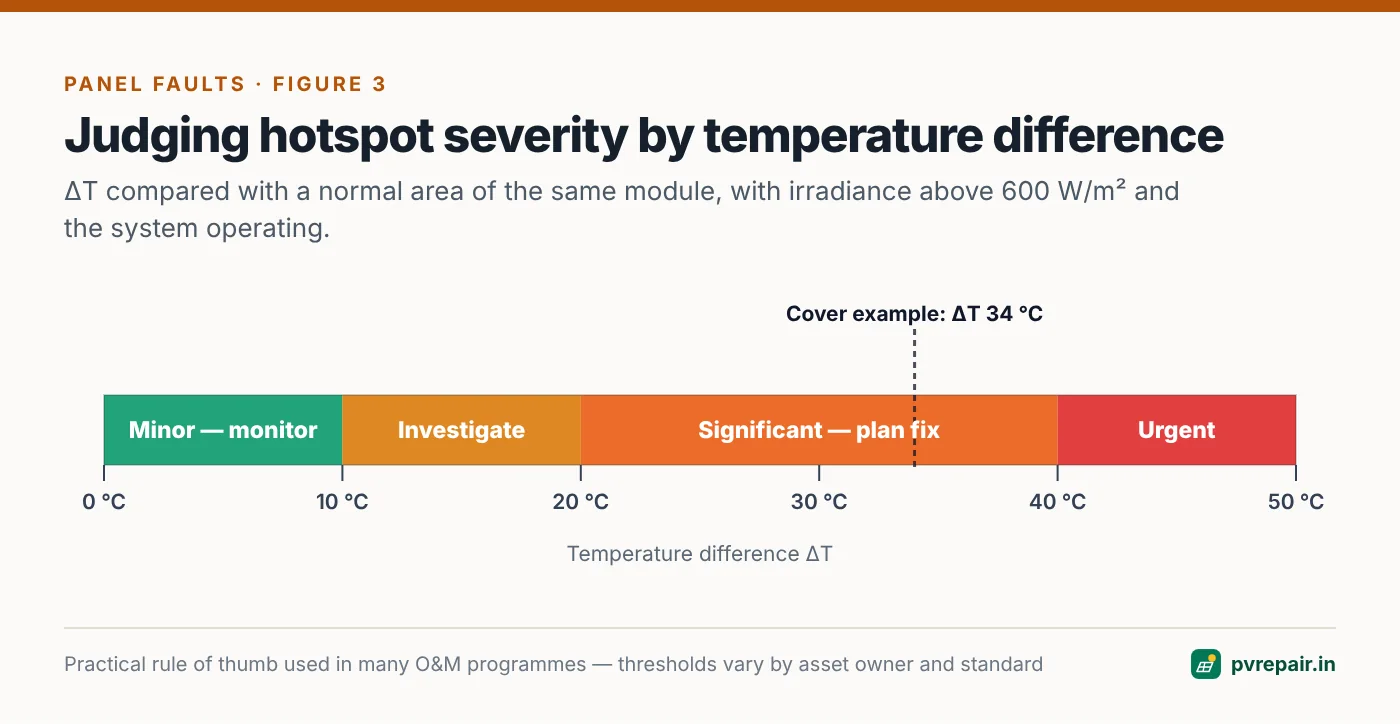
Severity is usually judged by the temperature difference (ΔT) between the hotspot and a normal area of the same module under the same conditions. As a practical rule of thumb used in many O&M programmes:
- ΔT under about 10 °C: minor — note it and re-check at the next inspection.
- ΔT roughly 10–20 °C: investigate the cause; clean, remove shading, and re-check.
- ΔT above about 20 °C: significant — plan corrective action.
- ΔT above about 40 °C, or any sign of burning, discolouration or backsheet damage: urgent — consider isolating the module or string and replacing the module.
Different standards and asset owners use different thresholds, so treat these as a starting point, and always consider the absolute temperature too.
Fixing hotspots
1. Clean and remove shading first
Many hotspots disappear after cleaning. Remove bird droppings, leaves and dust ridges, then re-image. Follow our solar panel cleaning guide for safe methods. For persistent shading from objects — a new satellite dish, a water tank, a growing tree — relocate the object or trim vegetation.
2. Address bird activity
If bird droppings are recurrent, consider bird deterrents. Pigeons nesting under panels also cause soiling and cable damage — see rodent and bird damage.
3. Check bypass diodes and junction boxes
If a whole third of a module shows as uniformly warm (a "substring pattern"), check the bypass diodes. If the junction box itself is hot, inspect it.
4. Replace the module when the defect is internal
Cracked cells, failed solder joints and internal ribbon defects cannot be repaired in the field in a way that preserves safety and warranty. If a hotspot persists after cleaning and is severe, replace the module and pursue a warranty claim. Keep thermal images, I–V measurements and serial numbers as evidence — manufacturers increasingly accept thermographic evidence when it follows recognised procedures.
Don't try to repair cells
Opening the backsheet, cutting into encapsulant or attempting to re-solder cells destroys the module's insulation and fire safety, and voids any warranty. Field repairs are limited to external items such as junction box lids (where the manufacturer allows it), connectors and cables.
5. Design to avoid shading
On new systems, use shading analysis during design to keep modules away from parapets, tanks and other obstructions, especially during the high-irradiance hours. Our guide to 3D solar design software covers tools that model this.
What to record in a hotspot inspection
A useful inspection report — whether for your own records, an O&M contract or a warranty claim — includes:
- Conditions: date, time, irradiance (from a reference cell or the inverter's sensor), ambient temperature, wind and cloud cover.
- Location: string, module position and module serial number for each anomaly.
- Images: a radiometric thermal image and a matching visual photo of the same area.
- Measurements: hotspot temperature, reference temperature on the same module and ΔT.
- Classification: your severity category and suspected cause (soiling, shading, cell, diode, junction box).
- Action: what was done (cleaned, shading removed, module replaced) and the re-inspection result.
Taking a visual photo alongside each thermal image is especially important. It shows whether a bird dropping, a leaf or a shadow explains the anomaly, and it makes reports understandable to people who aren't used to reading thermal images.
Is it worth replacing a module with a hotspot?
For a residential system, a single module with a significant hotspot is usually worth replacing — especially under warranty — because the cost is modest and the safety benefit is real. For a large commercial system with many minor hotspots, decisions are usually made on a mix of safety (anything urgent is fixed immediately) and economics (the energy lost compared with the cost of replacement labour and logistics).
When replacing, try to match the replacement module's electrical characteristics as closely as possible to the rest of the string — especially current at maximum power. A new, higher-current module in an older string won't hurt anything, but a lower-current module will limit the whole string. Note that the same model may no longer be available after a few years; your installer can help select a compatible substitute.
Frequently Asked Questions
Can a hotspot cause a fire?
In rare, severe cases, sustained hotspots can char the backsheet and encapsulant, and contribute to fire risk. That's why significant hotspots should be addressed promptly rather than left for years.
Can I see a hotspot without a thermal camera?
Sometimes you can see the consequences — brown discolouration, a burn mark, a bubble or a scorched area on the backsheet — but by then the damage is advanced. Early detection needs a thermal camera.
Will cleaning my panels remove hotspots?
If the hotspot is caused by soiling or bird droppings, yes. If it's caused by a cracked cell, a solder defect or a failed diode, cleaning won't help.
Are hotspots covered by warranty?
Hotspots caused by manufacturing defects (solder joints, cell defects) may be covered under the product warranty. Hotspots caused by shading, soiling or physical damage after installation typically aren't. Good documentation helps your claim.
How often should I do thermal inspections?
For residential systems, a thermal scan at commissioning and whenever performance drops is a sensible approach. For commercial and utility plants, annual thermography is common practice.
Related guides
Delamination, Backsheet Cracks and Broken Glass: Can a Damaged Solar Panel Be Repaired?
How to recognise delamination, backsheet cracking, chalking and broken glass on solar modules, why each one is a safety and performance risk, and which repair options are realistic versus when replacement is the only safe choice.
Potential Induced Degradation (PID) in Solar Panels: Detection, Recovery and Prevention
What PID is, why it affects modules near the negative end of a string in hot, humid climates, how to recognise the pattern in data and EL images, and how anti-PID devices and design choices can recover and prevent losses.
Microcracks and Snail Trails in Solar Panels: What They Mean for Performance and Warranty
How microcracks form in solar cells, why snail trails appear along them, how electroluminescence and thermal imaging reveal cracks, and when cracked modules need replacing or a warranty claim.